Homemade Crescent Rolls

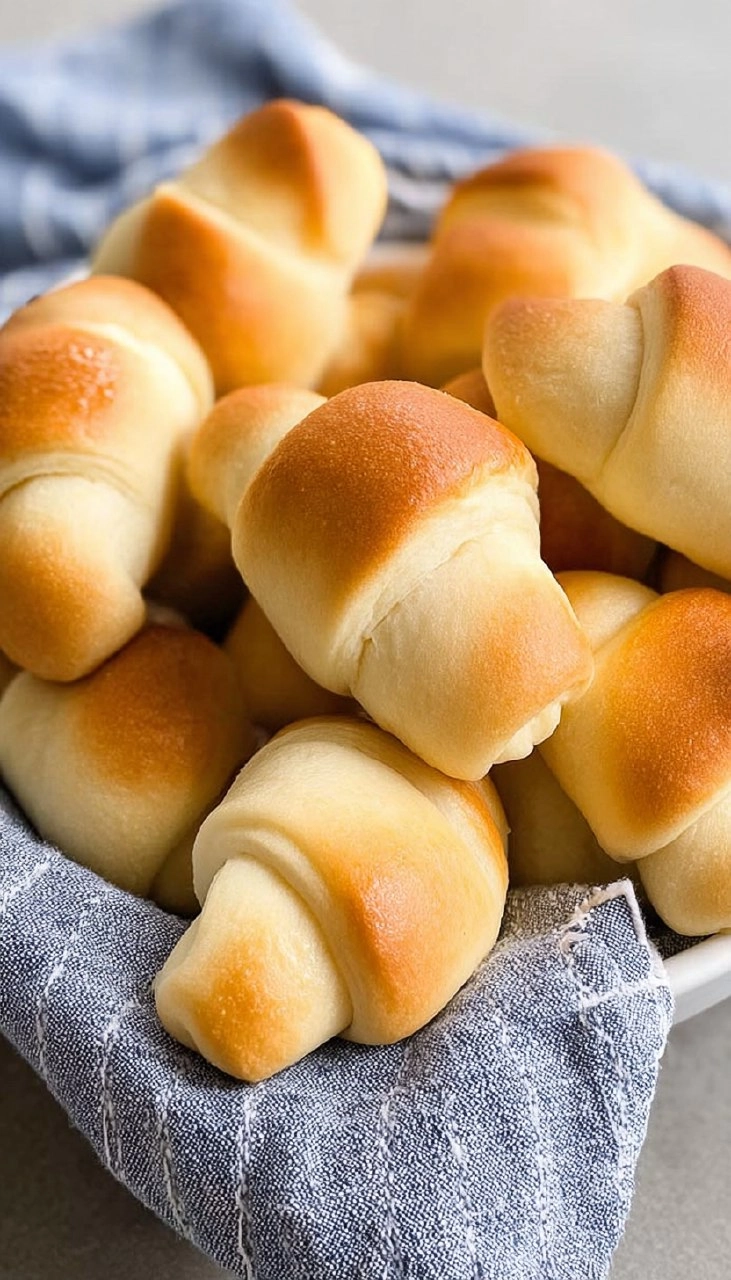
Making homemade crescent rolls can turn a simple meal into something special. Soft, flaky, and slightly buttery, these rolls carry a warmth that can only come from a kitchen filled with love. There’s a certain kind of magic that envelops the home when you bake bread from scratch, and this crescent rolls recipe captures just that. Whether you’re serving them at a holiday gathering or sautéing them to enjoy alongside your favorite bowl of soup, these delightful rolls are guaranteed to impress.
Table of Contents

I vividly remember the first time I made these rolls. The anticipation as the dough rose, the intoxicating smell wafting through my home, and the sheer joy of pulling a warm, golden batch from the oven were truly unforgettable moments. Homemade crescent rolls are not just a treat for the taste buds; they’re memories waiting to be made. They are surprisingly easy to craft, even if you’re new to baking. If you crave the irresistible allure of freshly baked bread, you’ve come to the right place. I can’t wait for you to make these homemade crescent rolls!
Why You’ll Love This Recipe
- Simple & Quick: These rolls come together in about 2 hours, letting you whip up a batch without much fuss.
- Irresistible Flavor: With their buttery taste and tender texture, they’re hard to resist, perfect for any meal.
- Eye-Catching Appeal: Their crescent shape makes them not just tasty but visually delightful, adding a touch of elegance to your table.
- Flexible Serving: Enjoy them as a side for dinner, a breakfast treat, or even a snack – the options are endless!
- Diet-Friendly Options: While these rolls are traditional, you can easily adapt them for various dietary needs.
Ingredients You’ll Need
- 3 cups (372g) all-purpose flour: A staple for baking, this flour gives the crescent rolls their desired structure. You can add up to 3 ½ cups if needed.
- 1 packet Instant Yeast (2 ¼ teaspoons or 7g): This is crucial for that fluffy rise; instant yeast means no need for pre-proofing.
- 2 tablespoons (25g) granulated sugar: This adds a hint of sweetness that complements the buttery flavor beautifully.
- 1 teaspoon salt: A little salt enhances the overall flavor of the rolls. Don’t skip this!
- ¾ cup (177ml) milk: Milk enriches the dough, providing moisture for a tender texture.
- ½ cup (118ml) water: Water activates the yeast, ensuring those delightful rolls puff up nicely.
- 3 tablespoons (42g) unsalted butter: Butter adds richness and a wonderful flavor. Always use unsalted for baking.
- ⅓ cup (33g) Idahoan Potato Flakes: This unexpected ingredient adds a touch of moisture, making the rolls soft and pillowy.
- 1 large egg: An egg enriches the dough and provides a lovely color to the final product.
- 2 tablespoons (28g) unsalted butter, melted (for brushing): This adds a nice shine and additional buttery flavor after baking.
How to Make Homemade Crescent Rolls
- Combine Dry Ingredients: In the bowl of a stand mixer fitted with the paddle attachment, combine 1 cup of flour, the yeast, sugar, and salt. Whisk to incorporate.
- Prepare Wet Ingredients: In a microwave-safe measuring cup, heat the water, milk, and butter until it reaches a temperature between 120°-130°F (about 1 minute in most microwaves). Stir in the potato flakes once it’s warm.
- Mix It Up: Pour the liquid mixture into the dry ingredients. Mix with the dough hook at medium speed for 1 minute. Incorporate the egg and 1 cup of flour, mixing for another minute. Gradually add a third cup of flour until the dough forms—a bit sticky is good!
- Knead the Dough: Transfer the dough to a floured surface, dust it, and knead until it forms a soft ball that bounces back when pressed—about 4-6 minutes. Cover it and let it rest for 10 minutes.
- Roll and Cut: After resting, divide the dough into two pieces. Roll each piece into a 10-inch circle and cut into 12 wedges, mimicking a pizza.
- Shape the Rolls: Starting from the wide end, roll each triangle towards the point, forming a crescent shape. Place them on a parchment-lined cookie sheet, spaced 1-inch apart. Cover with a kitchen towel and let them rise until doubled in size (about 1 hour).
- Bake: Preheat your oven to 375°F. Brush the rolls with melted butter and bake for 15-25 minutes, or until they are light golden brown. Brush with more melted butter after they come out of the oven for that extra shine!
- Store and Enjoy: Place in an airtight container at room temperature for up to 3 days or freeze baked rolls for up to 3 months.
- Make Ahead: You can prepare the rolls and place them on the cookie sheet, then cover tightly with plastic wrap and refrigerate for up to 24 hours. Let come to room temperature and double in size before baking.
Storing & Reheating
To keep your homemade crescent rolls fresh, store them in an airtight container at room temperature for up to 3 days. If you want to store them longer, freeze the baked rolls in a freezer-safe bag or container for up to 3 months. Reheat them in a preheated oven at 350°F for about 10 minutes, or until warm. Be aware that while they will still be delicious, the texture might change slightly after freezing, but you can refresh them with a quick brush of melted butter!
Chef’s Helpful Tips
- Ensure your water and milk are not too hot when adding yeast; you want to preserve the yeast’s potency.
- Kneading properly helps develop gluten, leading to chewier, lighter rolls.
- If your dough feels too sticky, add flour a tablespoon at a time until you reach the right consistency without overdoing it.
- Experiment with fillings! You can add cheese or herbs for a fun twist.
- If you’re making these ahead, refrigerating them is a great option, but ensure they have time to rise before baking.
When you make these homemade crescent rolls, you’re not just creating a side dish; you’re crafting a memorable experience that warms the heart and fills the belly. Whether you share them with loved ones or savor them solo, these rolls are bound to delight. I encourage you to get into the kitchen, try out this recipe, and enjoy the satisfaction that comes from creating delicious bread in your own home.
Recipe FAQs
Can I use active dry yeast instead of instant?
Yes! You can use active dry yeast in this recipe, but remember to dissolve it in warm water first and let it proof until foamy before adding to the other ingredients.
What if my dough doesn’t rise?
Ensure that your yeast is fresh. If it doesn’t foam when activated, it’s likely dead. Also, make sure your rising environment is warm—placing the dough in a slightly warm oven can help.
Can I add fillings to the crescent rolls?
Absolutely! Cheese, herbs, or even cinnamon-sugar for a sweet roll can be delicious additions. Just be mindful not to overfill, as this can affect the rolling and baking process.
How can I refresh leftover crescent rolls?
To refresh, wrap the rolls in aluminum foil and heat them in a preheated oven at 350°F for about 10 minutes. This will help revitalize their fluffy texture!
PrintMore Main Dishes Recipes
- Crispy Smashed Potatoes with Garlic & Za’atar
- Sheet Pan Salmon | Baked Salmon with Roasted Vegetables
- Lablabi (Tunisian Chickpea Stew)
- Rotel Chicken Bake
- Baked Penne | Cheesy Oven-Baked Pasta Casserole
Did You Enjoy Making This Recipe? Please rate this recipe with ⭐⭐⭐⭐⭐ or leave a comment.
📖 Recipe Card

Homemade Crescent Rolls
- Prep Time: 20 minutes
- Cook Time: 20 minutes
- Total Time: 40 minutes
- Yield: 24 rolls 1x
- Category: Bread
- Method: Baking
- Cuisine: American
Description
Enjoy the delightful flavor of Homemade Crescent Rolls! This easy recipe uses simple ingredients for a fluffy, buttery treat that’s perfect for your dinner table or any gathering.
Ingredients
- 3 cups all-purpose flour
- 1 packet Instant Yeast (2 ¼ teaspoons)
- 2 tablespoons granulated sugar
- 1 teaspoon salt
- ¾ cup milk
- ½ cup water
- 3 tablespoons unsalted butter
- ⅓ cup Idahoan Potato Flakes
- 1 large egg
- 2 tablespoons unsalted butter, melted (for brushing)
Instructions
- In a stand mixer bowl, combine 1 cup of flour, yeast, sugar, and salt. Whisk well.
- In a microwave-safe measuring cup, combine water, milk, and butter. Heat until between 120°-130°F. Stir in potato flakes.
- Mix the liquid ingredients into the dry ingredients with the dough hook for 1 minute on medium speed. Add the egg and another cup of flour; mix for another minute. Incorporate a third cup of flour until the dough is soft and slightly sticky; add more flour if necessary.
- Knead the dough on a floured surface until it forms a ball that bounces back when pressed. Cover and let it rest for 10 minutes.
- Divide the dough into two pieces and roll each into a 10-inch circle. Cut into 12 wedges like a pizza.
- Roll each triangle from the wide end to the point and place on a parchment-lined cookie sheet, spaced 1 inch apart. Cover and let rise until doubled in size, about 1 hour.
- Preheat the oven to 375°F. Brush the rolls with melted butter and bake for 15-25 minutes until lightly golden.
Notes
These rolls can be stored in an airtight container for 3 days.
Baked rolls can be frozen for up to 3 months for later enjoyment.
For make-ahead convenience, cover rolls on the cookie sheet tightly with plastic wrap and refrigerate for up to 24 hours.
Nutrition
- Serving Size: 1 roll
- Calories: 150
- Sugar: 1g
- Sodium: 150mg
- Fat: 5g
- Saturated Fat: 3g
- Unsaturated Fat: 1g
- Trans Fat: 0g
- Carbohydrates: 22g
- Fiber: 1g
- Protein: 4g
- Cholesterol: 15mg